
A user is a person working in a given client's company, authorized to perform various tasks within the functioning of the ONe platform. Users place orders, inquiries, support the ONe platform for work for a given client. Users can be also added in the ONe system.
It is possible using the API to create user, get information about the current user, edit and delete current user in external system. In platform ONe (frontend and backoffice) it is possible to create and edit client.
Table of contents
Table of contentsGlossaryGET users POST - create userGET user for synchronizationGET user by ID PUT - update user DELETE user
Glossary
Name | Explanation |
clientId | client identifier from the internal system (ONe platforms) |
name | user name |
phone | user phone number |
roleId | user role identifier. More information here |
userId | user identifier from the internal system (ONe platforms) |
GET users
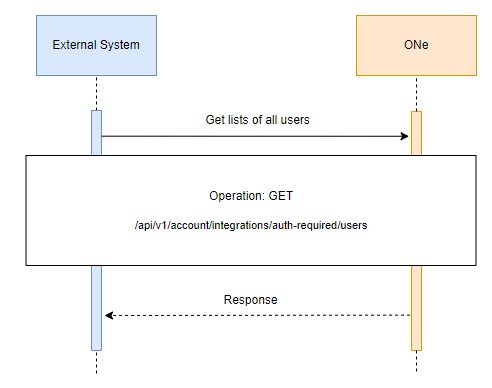
In this endpoind is possible to get whole list of clients. Use GET
/api/v1/account/integrations/auth-required/usersThe diagram below shows the dependency of communicating with the API:
To create user you need in request to put required the following data:
pageNumber- page number, integer($int32) - query
pageSize- page size, integer($int32) - query
Example request
jsoncurl -X GET "https://api-preprod.one.unity.pl/api/v1/account/integrations/auth-required/users?pageNumber=2&pageSize=103"
-H  "accept: */*"
-H  "one-tenant: {tenant}"
-H  "ApiAuth: {apiKey}"
In response we will get information about users
Example response
json{
  "listElement": [
    {
      "id": "86d7b233-297f-4e04-b669-9225f4146caf",
      "organizationId": "6284a18b-a241-4afa-93b7-b7b414311bb7",
      "clientId": "org:6284a18b-a241-4afa-93b7-b7b414311bb7",
      "email": "user1@b2b.one",
      "name": "Name Surname1",
      "phone": "2222222",
      "role": {
        "id": "8c1a260e-c6ef-4f04-90f6-f2bf6ec520d1",
        "organizationId": null,
        "clientId": null,
        "name": "Administrator"
      },
      "isActive": true,
      "agreements": []
    }
  ],
  "totalElement": 104,
  "items": [
    {
      "id": "86d7b233-297f-4e04-b669-9225f4146caf",
      "organizationId": "6284a18b-a241-4afa-93b7-b7b414311bb7",
      "clientId": "org:6284a18b-a241-4afa-93b7-b7b414311bb7",
      "email": "user2@b2b.one",
      "name": "Name Surname2",
      "phone": "200300400",
      "role": {
        "id": "8c1a260e-c6ef-4f04-90f6-f2bf6ec520d1",
        "organizationId": null,
        "clientId": null,
        "name": "Administrator"
      },
      "isActive": true,
      "agreements": []
    }
  ],
  "totalItems": 104,
  "pageNumber": 2,
  "totalPages": 2,
  "pageSize": 103,
  "nextPage": null
}
POST - create user
User can be created in 3 different ways:
- in external system,
- in fronted of ONe platform (check how to do it here),
- in backoffice of ONe platform (Customer → Customer Users → Create or Customer → Customers → choose Customer → Customer Users → create).
Before creating a user, it is recommended to create role for users. Here you can read how to do it.
Click here to see what to do when user was created in ONe. Below we will explain how to do it with the API.
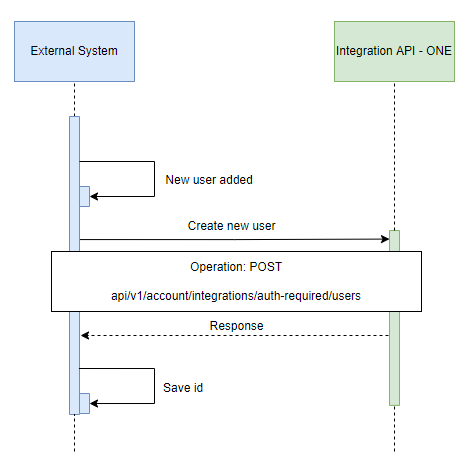
In next step use POST
/api/v1/account/integrations/auth-required/users to create user using the API.The diagram below shows the dependency of communicating with the API when user was created in external system:
To create segment you need in request to put required the following data:
email
name
phone
clientId.
You can also put additionally the following data:
roleId.
Example request
jsoncurl -X POST "https://api-preprod.one.unity.pl/api/v1/account/integrations/auth-required/users"
-H  "accept: */*"
-H  "one-tenant: {tenant}"
-H  "ApiAuth: {apiKey}"
-H  "Content-Type: application/json"
-d "{
{
  "clientId": "org:f1fb9b49-3363-42dd-ba7e-7ff992f8a311", -- required, client identifier
  "email": "user@b2b.one",
  "name": "Name Surname",
  "phone": "111111111",
  "roleId": null                                           -- user role identifier, null is treated like admin role
}"
In response we will get information about user ID.
Example response
json{
  "id": "2a8053b4-df8a-431a-b460-f6cc3725118a"
}
GET user for synchronization
As previously mentioned, There is possible to create user in ONe. The diagram below shows the dependency of communicating with the API when user was created in ONe platform:

In this case first of all you have to use GET
/api/v1/account/integrations/auth-required/users/synchronization to find the specified client created (or edited) in ONe. To create segment you need in request to put required the following data:
startId(query)
Example request
jsoncurl -X GET "https://api-preprod.one.unity.pl/api/v1/account/integrations/auth-required/users/synchronization?startId=1"
-H  "accept: */*"
-H  "one-tenant: {tenant}"
-H  "ApiAuth: {apiKey}"
In response we will get information about user id and type of step
Example response
json{
  "nextId": 9,
  "events": [
    {
      "userId": "9d57c6bb-42fb-49e9-ad31-93d6474ea8df", -- User identifier
      "type": "CREATE"                                  -- kind of type (possible create, update, delete)
    },
    {
      "userId": "2207e466-d4ce-40af-b5b6-4a13396ac4b6",
      "type": "CREATE"
    },
    {
      "userId": "872d80ad-f1f6-499c-a51f-881d9ab093c7",
      "type": "CREATE"
    },
    {
      "userId": "76791800-aba3-468a-b011-3e7b49f164a2",
      "type": "CREATE"
    },
    {
      "userId": "bc6f6591-6e47-4da8-8cc1-194df6440909",
      "type": "CREATE"
    },
    {
      "userId": "124fa1d5-9b99-4713-9823-00535f341984",
      "type": "CREATE"
    },
    {
      "userId": "abe2ff94-5b16-4ef7-a62d-3105a8073c29",
      "type": "CREATE"
    },
    {
      "userId": "e7a24f9c-9fa1-4c7d-9a53-ca3c4eafa710",
      "type": "CREATE"
    }
  ]
}
When we see that the trade credit has changed, we can use his ID to check the current data. Here's how to do it.
GET user by ID
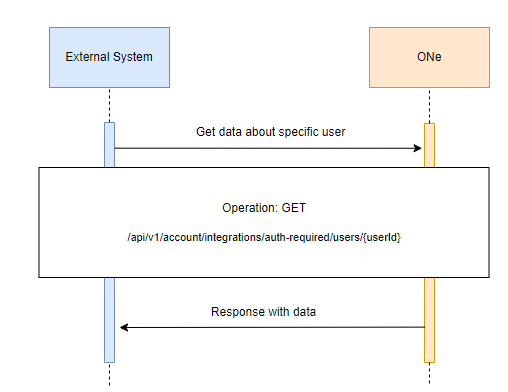
Now as you have
userId you can use GET /api/v1/account/integrations/auth-required/users/{userId} to receive information about specific user using his ID.The diagram below shows the dependency of communicating with the API:
To create segment you need in request to put required the following data:
userId(path)
Example request
jsoncurl -X GET "https://api-preprod.one.unity.pl/api/v1/account/integrations/auth-required/users/e7a24f9c-9fa1-4c7d-9a53-ca3c4eafa710"
-H  "accept: */*"
-H  "one-tenant: {tenant}"
-H  "ApiAuth: {apiKey}"
In response we will get whole information about user
Example response
json{
  "id": "e7a24f9c-9fa1-4c7d-9a53-ca3c4eafa710",
  "organizationId": "6f66333c-b058-42d1-b3b9-32bfa76ecd3a",
  "clientId": "ind:6f66333c-b058-42d1-b3b9-32bfa76ecd3a",
  "email": "user@b2b.one",
  "name": "name",
  "phone": "1111111",
  "role": {                                                     -- role information
    "id": "d19ade4a-e1d0-4d2f-82a1-962c596b623b",
    "organizationId": null,
    "clientId": null,
    "name": "Individual Client"
  },
  "isActive": true,                                             -- information whether the user has logged in to the platform
  "agreements": []
}
PUT - update user
User information can be edited both in an external system and in ONe platform. If user is edited in ONe, the further process is exactly the same as in the case of creating/editing a new user in ONe. Click here to go back to these steps.
In frontend of ONe platform is possible to update user information only refers to name and phone number
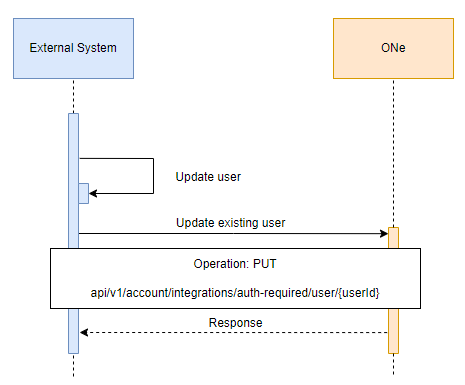
If information about user is to be edited by API use PUT
/api/v1/account/integrations/auth-required/user/{userId} to update existing clientin external system.
The diagram below shows the dependency of communicating with the API:
To create segment you need in request to put required the following data:
userId(path)
name
phone
You can also put additionally the following data:
roleId
Example request:
jsoncurl -X PUT "https://api-preprod.one.unity.pl/api/v1/account/integrations/auth-required/users/2a8053b4-df8a-431a-b460-f6cc3725118a"
-H  "accept: */*"
-H  "one-tenant: {tenant}"
-H  "ApiAuth: {apiKey}"
-H  "Content-Type: application/json"
-d "{
  "name": "Name Surname3",
  "phone": "3333333",
  "roleId": null
}"
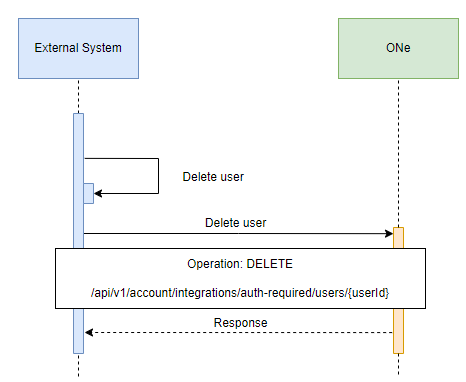
DELETE user
At the end you have the option to delete the user. Use DELETE
/api/v1/account/integrations/auth-required/users/{userId}The diagram below shows the dependency of communicating with the API:
To create segment you need in request to put required the following data:
userId
Example request:
jsoncurl -X DELETE "https://api-preprod.one.unity.pl/api/v1/account/integrations/auth-required/users/2a8053b4-df8a-431a-b460-f6cc3725118a"
-H  "accept: */*"
-H  "one-tenant: {tenant}"
-H  "ApiAuth: {apiKey}"